 | ||
 | E-commerce |  |
Integrating with iDEAL | ||
 |  |
iDeal is a popular payment processor in the Netherlands.
iDeal is made available via different banks and intermediaries. This document describes integrating via the ING bank
To integrate with iDeal
There are two types of iDeal integration, 'basic' and 'advanced'. neatComponents uses the iDEAL Basic system.
iDeal settings within neatComponents
In the Behavior Editor of the Shopping Cart component, there are specific settings which control how neatComponents integrates with iDeal.
Enable
Set this to Yes, and the customer will be shown a link which will take them to iDeal. (The text of this link can be customised too, in the Text / Links setting)
Test Mode
Set to 'Yes' to configure against the iDeal test server
Set to 'No' to configure against the iDeal live server - this is the setting to use when you are ready to take payments
Merchant ID
This is the number provided by iDeal.
Sub ID
This is another number provided by iDeal. This is used if you have several sites using the same iDeal account, to distinguish between them. If you are not using this feature, enter 0 (zero)
Goods Description
This controls what iDeal are told the goods are. This is a general phase like "Goods" or "Online purchase". (Max 32 chars)
Note that the website also passes a list of the items being purchased to the iDeal system.
Secret Keys
These are used to verify that the payent requests made by the site are actually being sent by the site, and not by a hacker. This must match the value shown on the iDeal site.
Note that the secret key for the iDeal test system and the Secrey Key for the iDeal live system will be different.
Installation settings within iDeal
Note: The layout of the iDeal interface may change from time to time, so the information here should be treated as a guide rather than definitive.
Note: iDeal provide a test server and a live server. Whilst these share some initial values - eg Merchant ID, they are configured separately, so settings you enter in the test server will need to be repeated on the live server.
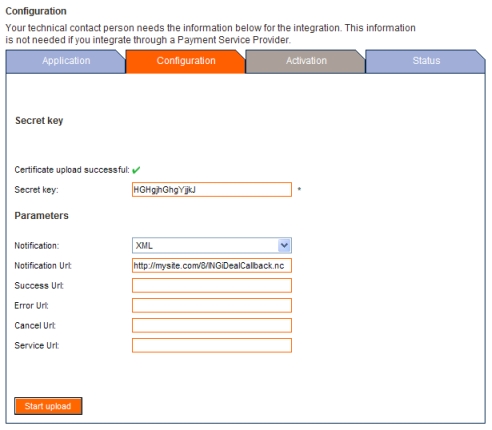
See the screenshot below for typical settings:

Secret Key
This refers to a certificate that iDeal generate. To make them generate this, click the 'Start upload' button. They create a certificate, place a green tick against 'Certificate upload successful' and place a value in the Secret Key field. This is the value you need to place in the Secret Key field in neatComponents (see above)
Notification
Set to 'XML'
Notification Url
Set this to the numeric url of your shopping cart, with /INGiDealCallback.nc at the end.
Success Url, Error Url, Cancel Url, Service Url
Leave these blank. (The values for these are set dynamically by neatComponents as appropriate)
Testing and Activation process
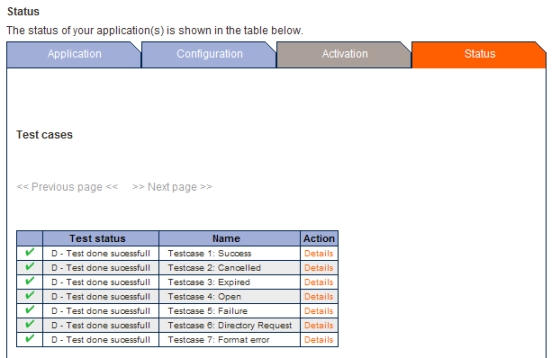
Once the settings as described above have been entered in both the neatComponents and iDeal systems, you need to execute seven Testcases against their Test system (not the live one) so their systems can be satisfied that everything is working. To do this, you need to set you system to ask for payments of various amounts. For Testcase 1, this is 1 Euro, for Testcase 2 it is 2 Euros, etc
When this is complete the Status tab of the iDeal system will show a green tick against each Testcase.

You then wait for them to validate this, which happens overnight.
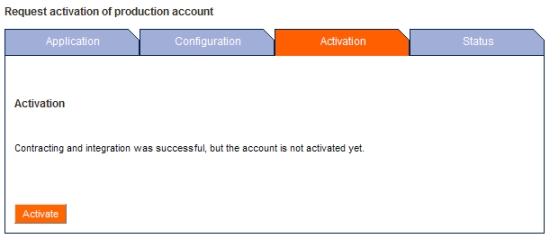
Then, when you log in to the iDeal Live server, you will see the Activation tab is ready to be used:

Click 'Activate' to activate the installation.
Remember to return to the Configuration tab on the iDeal live server to complete that - as the settings are not copied over from the test server.
You can then ask them to activate the account, after which you can start taking transactions for real.
IMPORTANT: Unlike most payment providers, iDeal basic callbacks to the website do NOT inform the website whether the transaction was successful, and payment was acquired, but merely that the action was completed. They require that you visit their website to confirm whether payment was successful, before you take any action to fulfill the customer's order.
Copyright © 2025 Enstar LLC All rights reserved |

