| |
clearString neatComponents
| |
|
clearString neatComponents Creating a private message system |
| How-to Resources | ||
Creating a private message system | ||
Creating a private message system
Start with a blank template site, and use the following method to end up with this site
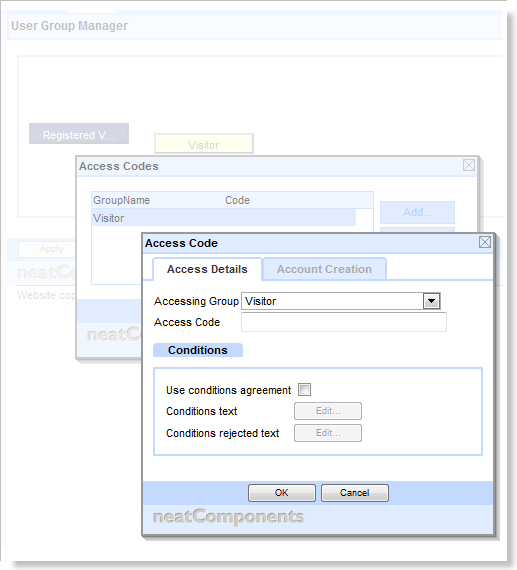
In the User Group Manager, Registered Visitor, Access Codes, add a new access code, with Accessing Group of ‘Visitor’ and leave the ‘Access Code’ blank.
In the Layout Manager:
Before ‘Section 1’,
- Add a new top-level Page, called ‘Home’
Set this as the Site Default Page
BE / Permissions / Visitor / View Page = Deny
Delete ‘Section 1’ and ‘Section 2’
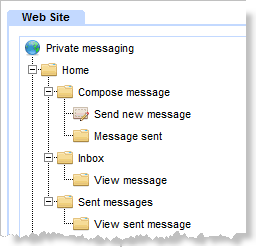
Under the Home page,
- Add a Page called ‘Compose message’
- Add a Page called ‘Inbox’
- Add a Page called ‘Sent messages’
Under the ‘Compose message’ page,
- Add a new Data Entry Form called ‘Send new message’
Set this Hidden
- Add a Page called ‘Message sent’
Set this Hidden
Under the ‘Inbox’ page,
- Add a Page called ‘View message’
Set this Hidden
Under the ‘Sent messages’ page,
- Add a Page called ‘View sent message’
Set this Hidden
In the Layout Manager: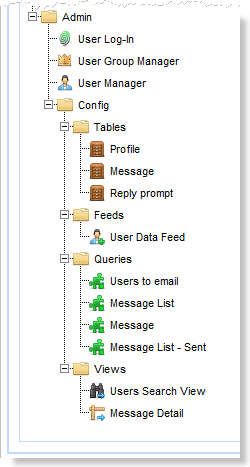
Under the Admin page,
- Add new child pages:
- Tables
- Feeds
- Queries
- Views
Under the Tables page,
- Add a Table called ‘Profile’.
- Add a Table called ‘Message’.
- Add a Table called ‘Reply prompt’
Under the Feeds page,
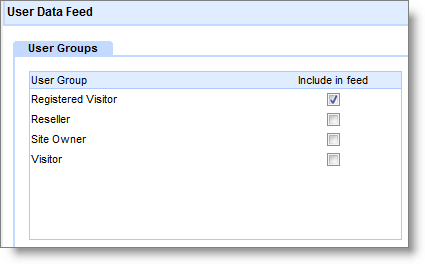
- Add a User Data Feed called ‘User Data Feed’
Under the Queries page,
- Add a Query called ‘Users to email’
- Add a Query called ‘Message List’
- Add a Query called ‘Message’
- Add a Query called ‘Message List – Sent’
Under the Views page
- Add a Search View called ‘Users Search View’
- Add a custom View called ‘Message Detail’
Configure the Admin page,
- BE / Permissions / Visitor / View Page = Deny
- BE / Permissions / Registered Visitor / View Page = Deny
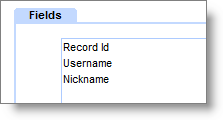 Configure the Profile table to have fields:
- Record ID (type Record ID)
- Username (type Username)
- Nickname (type Text)
Set the Record Identifier to be the Username field.
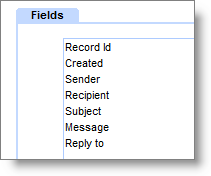 Configure the Message table to have fields:
- Record ID (type Record ID)
- Created (type Created)
- Sender (type Username)
- Recipient (type Record Link)
Link to: Table – Profile
Auto-complete
Complete with ‘record id’ page parameter = Always
- Subject (type Text)
- Message (type Rich Text)
- Reply to (type Record Link)
Link to: Table – Message
Auto-complete
Complete with ‘record id’ page parameter = Always
Set the Record Identifier to Record ID
Configure the User Data Feed to include users from the ‘Registered Visitor’ user group
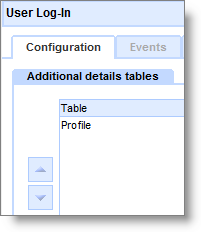 On the Login page,
- Configure Log-in, Configuration tab, add the Profile table to the ‘Additional details tables’
- BE / Settings / Options / Default Forms / Field Display, set “Show additional details table fields” to Yes
Create some users
Using a different browser (so you can login and out as different users without interrupting your site configuring) browse to the site, and on the login page, click the ‘Register Here’ link. Fill in the registration form as a test user. Log out, and repeat a few more times with different fake usernames. This will make testing and visualising your configuration easier.
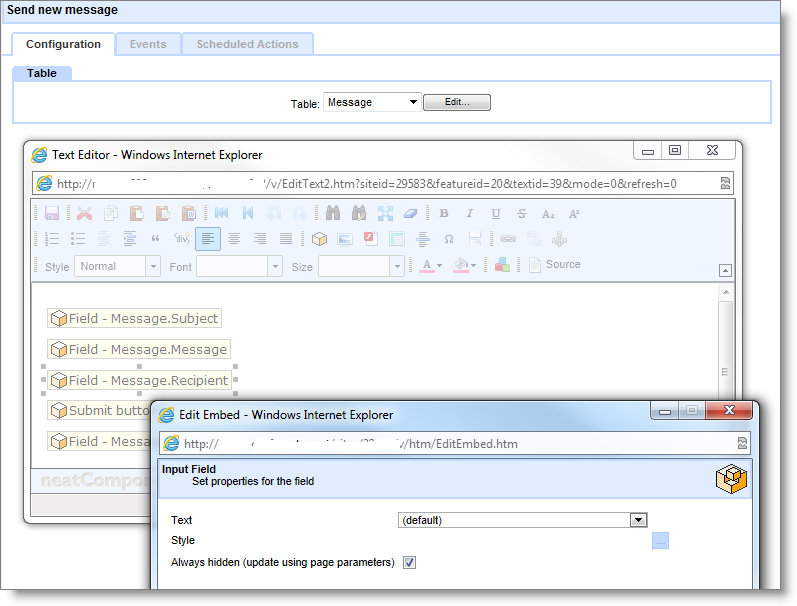
Configure the Send new message Data Entry Form:
- Set the Table to ‘Message’ and apply
- On the Record Edit View surface, include the fields:
Subject
Style: Layout / Width = 100%
Message (initially show editor toolbar expanded)
Recipient (Always hidden (update using page parameters))
Submit button (with button text set to ‘Send’)
Reply to (Always hidden (update using page parameters))
- BE / Settings / Options / Record Edit View = Custom
- BE / Settings / Options / Redirect target after record update = Message Sent
- BE / Permissions / Registered Visitor / Submit Records = Allow
Configure the Message Sent Page
- Add some text to the page ‘Your message has been sent’
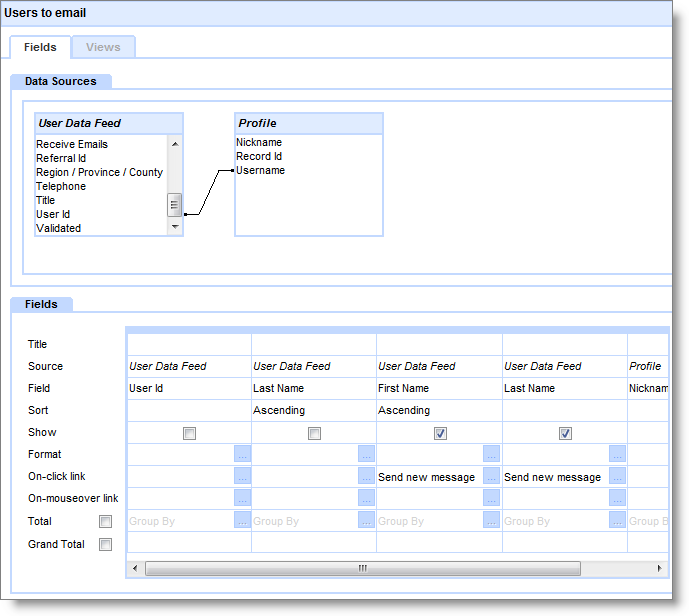
Configure the query Users to email
- Add a data source ‘User Data Feed’
- Add a data source ‘Profile’
- Join the User Data Feed.User id to the Profile.Username
- Add the fields, in order:
- User ID (uncheck ‘show’)
- Last Name (uncheck ‘show’, sort Ascending)
- First Name (sort Ascending)
- Last Name
- Nickname
- For both the First Name and Last Name fields that are set to Show, configure the ‘On-click link’:
Local page – Send new message
QueryString parameters: action=edit&replyid=-1
Parameters: custom / Profile.RecordId
Configure the Users Search View
- Select the Query ‘Users to email’
- In ‘Apply text criteria to:’ select the fields:
- First Name
- Last Name (this field will be offered twice, choose either of them)
- Nickname

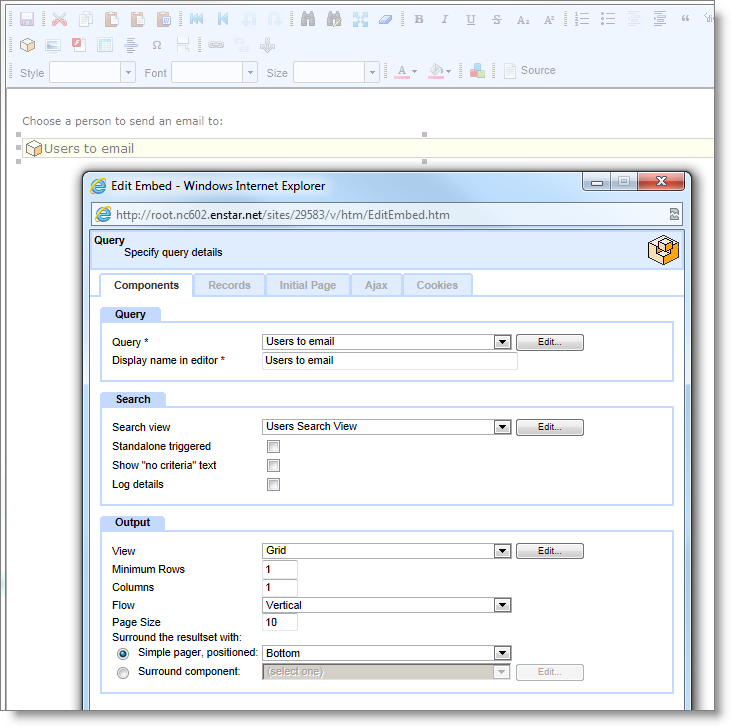
Configure the Compose message page
- Edit the page,
- Add some text “Choose a person to send an email to:”
- and embed the ‘Users to email’ Query
- Search view: ‘Users Search View’
- View: ‘Grid’
Configure the Table ‘Reply prompt’
- Add a field “Reply” (type Text)
- In the ‘View Table’ mode, add a record
o In the Reply field, enter the word ‘Reply’
Configure the Query ‘Message List’
- Add the following Data Sources:
o Message
o Profile
o User Data Feed
o Profile (this will appear as ‘Profile_1’)
- Join the Data Sources:
o User Data Feed.User Id – Profile.Username
o Profile.Username – Message.Sender
o Message.Recipient – Profile_1.Record Id
- Add the fields in order:
o User Data Feed.First Name
o User Data Feed. Last Name
o Message.Subject
§ On-click link:
· Local Page / View message
· Parameters: custom / Message.RecordId
o Message.Created
§ Sort Descending
§ Format: select a format that shows both the date and the time
o Profile_1.Userame
§ Uncheck ‘Show’
Configure the ‘Inbox’ Page
- Embed the Query ‘Message List’
o View: Grid
o Records: Criteria
§ Username Equal to Current User
Configure the Query ‘Message’
- Add the following Data Sources:
o Message
o Profile
o User Data Feed
o Profile (this will appear as ‘Profile_1’)
o Reply prompt
- Join the Data Sources:
o User Data Feed.User Id – Profile.Username
o Profile.Username – Message.Sender
o Message.Recipient – Profile_1.Record Id
o (note: there should be no join to the ‘Reply prompt’ data source)
- Add the fields:
o Message.Subject
o Message.Message
o Message.Created
§ Format: select a format that shows both the date and the time
o User Data Feed.First Name
o User Data Feed.Last Name
o Message.Record Id
o Profile.Username
§ Title=Sender
o Profile_1.Username
§ Title=Recipient
o Reply prompt.Reply
§ On-click link:
· Local page / Send new message
· Querystring: action=edit&replyid=-1
· Parameters: custom
o Profile.RecordId
o Message.RecordId
Configure the Custom View ‘Message Detail’
- Select the Query ‘Message’ and Apply
- Edit the ‘Records’ surface:
o Add the fields:
§ Subject
§ First Name
§ Last Name
§ Created
§ Message
§ Reply
o Arrange them in a layout of your choice.
Configure the page ‘View Message’
- Embed the Query ‘Message’
o View: Message Detail
o Records: Criteria
§ Recipient Equal to Current User
§ Record Id Equal To Parent parameters
· Require value = Checked
Configure the Query ‘Message List - Sent’
- Add the following Data Sources:
o Message
o Profile
o User Data Feed
o Profile (this will appear as ‘Profile_1’)
o User Data Feed (this will appear as ‘User Data Feed_1’)
- Join the Data Sources:
o User Data Feed.User Id – Profile.Username
o Profile.Username – Message.Sender
o Message.Recipient – Profile_1.Record Id
o Profile_1.Username – User data Feed_1.User Id
- Add the fields in order:
o User Data Feed_1.First Name
o User Data Feed_1. Last Name
o Message.Subject
§ On-click link:
· Local Page / View sent message
· Parameters: custom / Message.RecordId
o Message.Created
§ Sort Descending
§ Format: select a format that shows both the date and the time
o Profile.Username
§ Uncheck ‘Show’
Configure the page ‘Sent messages’
- Embed the Query ‘Message List - Sent’
o View: Grid
o Records: Criteria
§ Username Equal to Current User
Configure the page ‘View sent message’
- Embed the Query ‘Message’
o View: Message Detail
o Records: Criteria
§ Sender Equal to Current User
§ Record Id Equal To Parent parameters
· Require value = Checked
Copyright © 2026 Enstar Systems Inc. All rights reserved |