| |
clearString neatComponents
| |
|
clearString neatComponents Record Links with a cascade - an example |
| How-to Resources | ||
Record Links with a cascade - an example | ||
Record Links with a cascade - an example
Using Cascades- an example
This example shows how to configure a Record Link field to display as a cascade.
How to use this example:
Download the example site, and use this documentation to understand how it was constructed before adapting it for your own needs.
Download the finished example site
- or -
Start with the earlier example site, that this demonstration starts from, and follow the documentation to replicate the example site yourself.
What is a cascade?
A cascade is a way of getting a selection from a user by first offering a broad category choice, and then on the basis of their selection, providing a second list to choose from.
Why use cascades?
If you only have a short list of items to choose from, they fit easily in a dropdown list, and there is no need to consider using a cascade.
However if the selection is long, it won't fit into a dropdown nicely, and the system will move over to using a search interface. That's fine if the user knows what they are aiming for, but sometimes you still want to allow them to browse. Cascades allow this.
If the selection is very long, it will also impact on performance, as the whole list has to be downloaded before it can be displayed. However, with a cascade only the list being displayed at each stage is downloaded, so page display is faster, and bandwidth overhead is reduced.
A simple example
This example continues on from the Record Link example. Read that first to become familiar with Record Links.
In the example, we start with a Record Link that allows a US State to be selected. We will extend that to use a cascade such that the user is first asked to select a country, and then is presented with a list of States within the chosen country.
Note: Whilst the user needs to make two selections – Country, then State, it is only the State that gets stored in the Table. Should you need, elsewhere in the site, to find out which Country was selected, you can use a Query with a Join to get that information back.
First we need to create the Table containing the Countries
- Add a Table to the site, and call it "Country"
- From the Toolbox, choose Configure Table, and on the Configuration tab:
- In the Fields section, add a field, type Text, and call it 'Name'
- In the Records section, set the Record Identifier to the 'Name' field
- Click Update
The configuration should look like this:

Now we need to populate the Table with the names of the Countries. We'll just add two to get started.
From the Toolbox, choose View Table
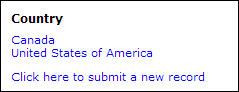
Click the link 'Click here to submit a new record'
Enter a Country name, and Click 'Submit Form'
You are then shown a confirmation of the entry. To enter another record, choose View Table from the Toolbox.
Note: To speed entry, you can skip this screen: In The Behavior Editor / Settings / Options / Redirect target after record update, click [...] and select Local Relative Page / Current Page
When done, the form should show them all (or in our case, just two for now):
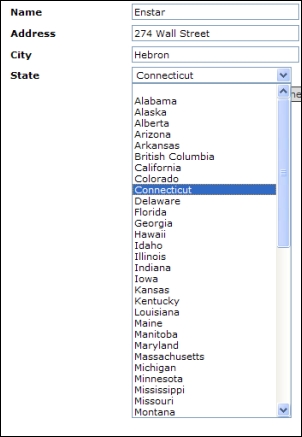
Now we have our list of Countries, we link to it using a Record Link field on the State Table.
- Browse to the Table, 'State'
- From the Toolbox, choose Configure Table, and on the Configuration tab:
- Add a Field of type Record Link, called 'Country'
- Under the Link to tab, set the Table to 'Country'
Our existing State records are all in the USA, so we need to set them to that country. We could go through them individually, but that would take some time. Helpfully, the system will do that for us in one go:- Click the [...] button beside 'Default Value'.
- In the search picker, type in 'united', and click 'Go'.

- Select the 'United States of America' entry, and click OK
- Click OK in the field properties dialog.
Because we made a change to the 'Default Value', we are now prompted to confirm which records this should affect:
- Choose 'affect all records' (so that our existing records get given the 'United States of America' value, and click OK
Now we need to add in some more entries into the State table for Canada.
For each one, enter the name of the State / Province, and then select Canada from the Country dropdown.
Now we can configure the cascade, which will appear on the 'Contact' Table.
At the moment, when entering a new record into the 'Contact' form, a dropdown or search picker is shown.
We will change this so a dropdown is first shown asking for the Country, followed by another asking for the State
- Browse to the Table 'Contact'
- From the Toolbox, choose Configure Table, and on the Configuration tab:
- Select the State field, and click 'Edit...'
- On the 'Blank Option Text' enter "<choose>"
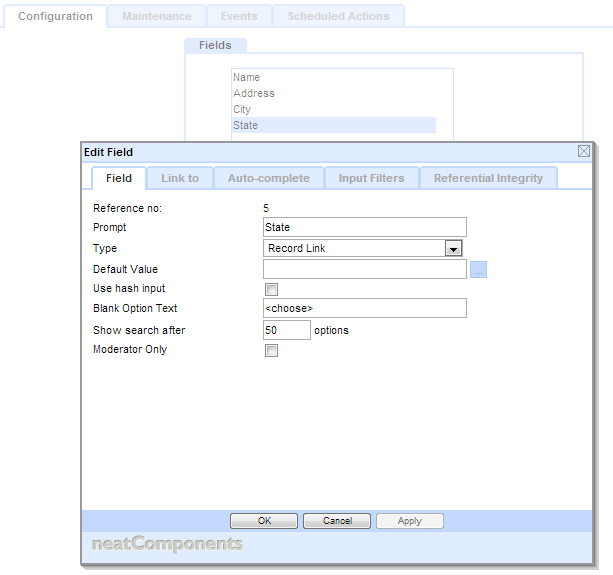
- On the Input Filters tab, select 'State.Country' from the dropdown in the Filter field column.
- In the 'Prompt' column on the same row, enter 'Choose a country'
- In the 'Blank option text' on the same row, enter '<choose>'
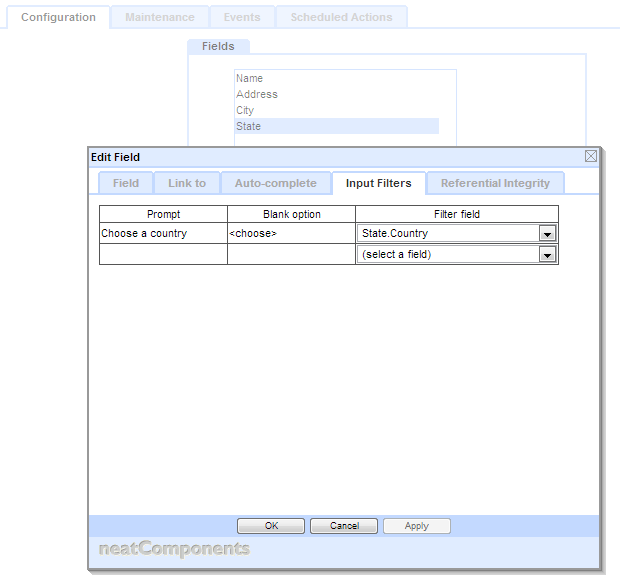
OK, out of the dialog to save changes.
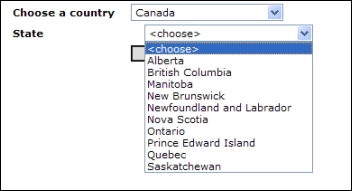
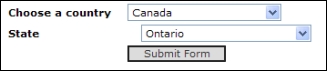
Now, when you enter a new record in the 'Contact' Table, you are asked to choose a country. The State dropdown is shown too, as a hint of what will be asked next, but for now is greyed out.

Once the country is selected, the State dropdown retrieves its list from the server, and is activated to allow the use to select the state
Note: in this example the cascade contained two levels, but there is no limit to the number of levels. Simply configure each table in the chain with Record Link fields from one to the next, and you can then set up a multi-level cascade, by adding more rows in to the Cascading input filters section of the Record Link field you want to show as a cascade.
Countries in English csv...
States and Provinces csv...
See also - Simple csv import
Copyright © 2026 Enstar Systems Inc. All rights reserved |