Set up LAN/Intranet accessScenario 2 - Working across the LANBy working on the LAN we mean installing neatComponents on one machine and then accessing it to create and work on websites from another machine on your local area network. You might be doing this to learn how to assign domain names to your website, or to simulate working across the Internet without having to set up DNS records. This is also how you would use neatComponents for Intranet use.An important concept
neatComponents creates a complete hosting environment for an unlimited number of sites and applications. They are all hosted on the same machine. neatComponents uses the domain name to determine what site to respond with. This means that you cannot 'simply' point your web browser at the IP address of the server. You always must browse to a domain name -http://www.example.com If you want to access the Server Manager from the host machine itself you can browse to a reserved address: http://local.neatcomponents.com but that address only works on the machine itself. You need to make a minor configuration adjustment to access the Server Manager from across the LAN.Before you start - set the IP Address
The neatComponents machine, real or virtual, must have a fixed IP address on your LAN. New Windows installations are normally set to DHCP, or dynamic IP address, which is not suitable for hosting your own websites. This page explains how to set a fixed IP address. Accessing the Server Manager across the LANIf you want to browse to your neatComponents Server Manager from another machine on your LAN - then the local solution without setting public DNS records, is to use the 'Hosts' file on the machine you are testing from on your LAN. This will tell the web browser on that machine where to find the Server Manager.Method
First: add a domain name to the Server Manager that it will listen to from across the LAN, for example: neatcomponents.lan 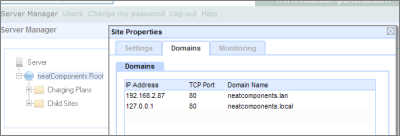
Open the Server Manager on the host machine by browsing locally to http://local.neatcomponents.com
or
By going to Windows Start-menu, and selecting Root Web Site from the neatComponents entry. Right-click on the Root, and in Site Properties select the Domains-tab, and
Add a new Domain Name, for example: neatcomponents.lan
Set to listen on the LAN IP Address of the machine - 192.168.2.87, in this example.
The neatComponents Server Manager will now respond to requests for http://neatcomponents.lan
(neatcomponents.lan is just an example, it can be any valid domain name that you control
for example: http://mysites.example.com, http://server.domain.net, and so on).
You now need to tell any machine on the LAN where to find http://neatcomponents.lan'A-Records'
Normally you enable access to the websites you create in neatComponents by setting the 'A-Record' in your public domain 'DNS' to point to your neatComponents server. The 'A-Record' points to the IP Address of the website for a given domain name, and is how any web browser, anywhere in the world, knows where your website is. Simulate an A-Record
You can simulate having an A-Record for local or testing purposes by using the 'Hosts' file on the machine you are browsing from. Your web browser (Internet Explorer, Safari, Firefox, etc) locates websites by checking the DNS record for the domain, however before the browser looks as an external DNS server it always checks its own Hosts file to see if there is a fixed address for a given domain.You can use the Hosts file to force your browser to go to a specific IP address for your domain, even if you have not created a public DNS A-record. Naturally this will only work from your machine, but it is a quick and easy way to test access. Note:
Anti-virus software, such as Norton, may by default, prohibit changes to the Hosts file. You will need to adjust the 'exclude' settings in your A-V software to allow. Windows - where is the Hosts file?
The Hosts file is a special file located here on all current Windows computers:
C:\WINDOWS\system32\drivers\etc\hosts 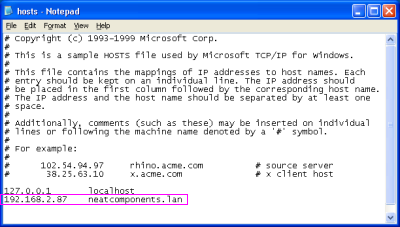
Open the Hosts file in Notepad, and make an entry similar to the one highlighted above 192.168.2.87 neatcomponents.lan using the IP address of the machine that neatComponents is installed on
in place of 192.168.2.87 The process is similar in Linux and Mac systems. Linux and Mac OSX
The hosts file is usually found in: /etc/hosts Now, when you browse to http://neatcomponents.lan FROM THAT MACHINE ONLY you will be directed to your new Server Manager, just as if you were browsing across the Internet. If you want to browse from more than one machine then you would need to set the Hosts file on each machine. We don't recommend doing that - you should set proper DNS records as explained below.When you have finished testing, remember to remove that line from your Hosts file to avoid future address conflicts.Accessing an individual site across the LANIn a similar manner you can use the Hosts file to access a site you have created in your neatComponents Server Manager.In the Server Manager-tree, Child Sites entries, use the individual site's 'Site Properties' dialog, to set the domain name, in this case, www.example.com to listen on the Server Manager's local LAN IP address, in this case 192.168.2.87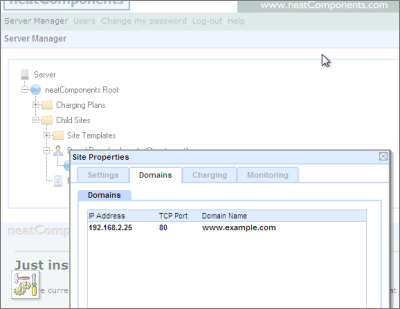
Next, just as in the previous example, you must edit the Hosts file of the local machine you are browsing from by adding in a line telling the browser where to locate www.example.com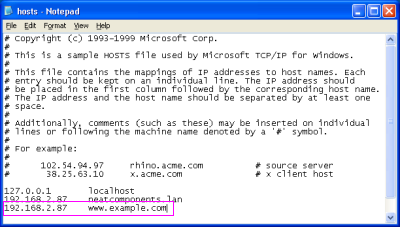
Now, when you browse to http://www.example.com FROM THAT MACHINE ONLY you will be directed to your new website, just as if you were browsing across the Internet. |