| |
clearString neatComponents
| |
|
clearString neatComponents Creating the Example Site |
| Application Development | ||
Creating the Example Site | ||
 What are we learning here?
We learn how to create a new site on your own server.
 Using our Cloud?
If you are using our Cloud the site will already have been made for you so you should skip this section and move on to 'What have I got?'
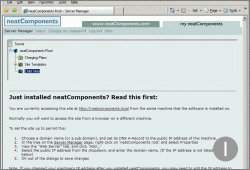
Go to the 'Server Manager'
Open the 'Server Manager' on the neatComponents machine by browsing to it.
Local testing
If you are testing on the same machine that neatComponents is installed onto then you can return to it by browsing to http://local.neatcomponents.com in your web browser on that machine: you will need to log in again using the email address and password that you created during the install process.
Remote testing
If you have installed neatComponents onto another machine than the one you are currently testing from then you will need to access that machine - read how
Create your example site.
neatComponents ships with a ready to use example site-template for use with this Tutorial. We need to create the example site and add it to the 'Child Sites' in the Server Manager site tree.
Method
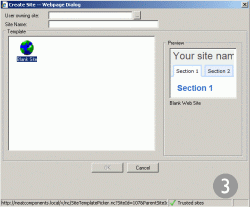
In the Server manager tree-view, (1) select the Child Sites entry. Right-click, and (2) from the drop-down menu select 'Create Site'.

The Create Site - Webpage Dialog will open, (3) to offer you a Template to select, with a Preview to the right. Select the Blank Site.
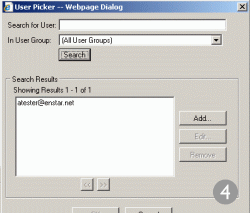
All sites must be Owned by a user previously registered on the system. To find the available users already registered click the [...] button.
In the (4) User Picker, click the [Search] button to show the list of users in (All User Groups). You will expect to find just one user - yourself: with the email address you used to register.
Select the User, by clicking the entry, and click [OK].
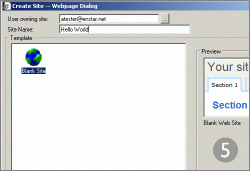
You will be returned (5) to the 'Create Site' dialog where you must give the site a name.
At 'Site Name' enter the words 'Hello World', and then click [OK] back to the Server Manager.
Expand (6) the Server Manager tree to show your new site.
Select 'Hello World', then right-click and select [Open in new Window]

Your 'Hello World' site will now open in a (7) new browser window.
This is your new website. It is ready to use, but you do not yet have 'edit access' to the site - you are viewing it like a member of the public.
You can now close the browser window on the Server Manager. You will be using your new 'Hello World' site for the tutorial. The instructions to get back to it are here.
Log into the site
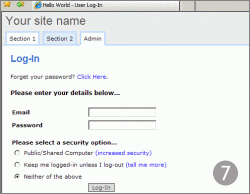
Go to the Admin section of your new 'Hello World' site and Log-in at the 'Admin-tab' - use the same email address as you did above, together with the password you chose during installation. You should now be redirected to the (8) first page of your new website.
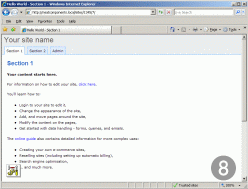
 Note that you now see a floating gear or toolbox-icon in the lower-left corner of the window. This indicates that you are logged in, and gives you access to the site management tools.
![]() The next step is to see how to work with the site itself ...
The next step is to see how to work with the site itself ...
Below the line...
Advanced configuration tips
The system is installed on one machine (the server) and then is accessed with a web browser, normally from other machines (clients) on your local network or across the Internet. After the initial installation all other management and configuration is done using a web-browser.
In Production
In the 'real world' you would not work on a website from the server itself - once it is installed on the server you would treat that machine as a dedicated appliance. So, the system is installed on its own machine - either in your office, as a cloud-instance, or at a regular hosting company and you access it across the Internet using Chrome, Edge, FireFox or whatever, from your usual computer.
Setting a Child Site domain-name or Cloud Trial domain name.
The process of setting domain names to the individual site that you create is very similar to the process used for setting a domain name to the server itself using the matching dialog box in the site itself. See detailed advice...
Creating your first app In this section |
|
Creating your first app
In this section: | |||
|


Copyright © 2026 Enstar Systems Inc. All rights reserved |