Setting up Server accessneatComponents provides a complete Windows-based hosting environment with integrated codeless web development software from one download. This means that normally you install neatComponents on one machine and then do everything else from other machines either across your Local Network, or more commonly across the Internet.In this article we will explain about accessing your neatComponents server so that you can get started creating sites and developing them. Alternate Scenarios Working across the InternetThis is the normal method of working, and is the method used when using an Amazon EC2 cloud instance..Your web browser (Internet Explorer, Firefox, etc) locates websites by checking the DNS record for the domain.Here we explain how to set the Server Manager site to permit access from a different machine across the Internet by following the instructions on the Server Manager page (highlighted below):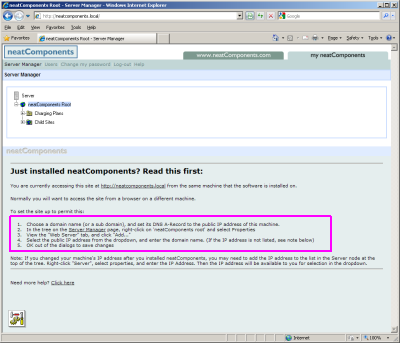
- Choose a domain name (or a sub domain), and set its DNS A-Record to the public IP address of this machine.
- In the tree on the Server Manager page, right-click on 'neatComponents root' and select Properties
- View the "Web Server" tab, and click "Add..."
- Select the public IP address from the dropdown, and enter the domain name.
- OK out of the dialogs to save changes
Choose a domain nameThis is the domain name that you want to use for managing the server across the Internet. It is not the domain name of one of the sites. This domain name is used like the http://local.neatcomponents.com, and neatcomponents.lan examples above: e.g. hosting.example.com How to set your public domain 'DNS'
This page - A DNS Primer - explains how to set up domain names if you are unfamiliar with the process. The domain name/s must be set to 'Point to...' the public facing IP address of the Internet connection that the neatComponents machine is using. Working with Amazon EC2
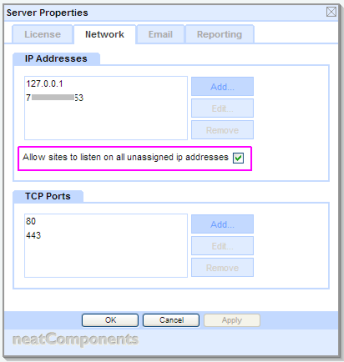
If you are installed onto an Amazon AWS EC2 instance see: 'Understanding AWS IP Addresses' here... Adjust the Server ManagerFirst: Set server to 'listen'.Open the Server node | Properties and check the top-node Server Properties Network-tab is set to 'Allow sites to listen on all unassigned ip addresses'. 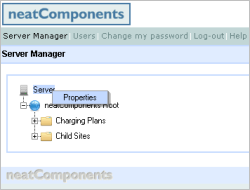
Second: Add the Domain name
Open the Server Manager on the host machine by browsing locally to http://local.neatcomponents.com
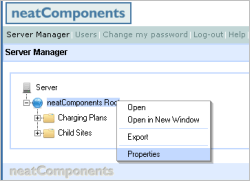
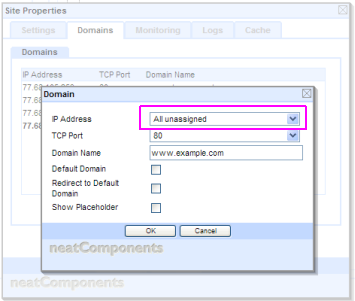
Right-click on the Root, and in Site Properties select the Domains-tab, and
Add the Domain Name: manage.example.com or www.example.com - use your domain name
Set to listen on all unassigned IP addresses.
The neatComponents Server Manager will now respond to requests for that domain.
You can now access the Server Manager from across the Internet.
Advanced Configuration Advice Working behind NAT
The configuration examples on this page assume that the machine that neatComponents is installed on is on your LAN, and is using Port-forwarding or Network Address Translation (NAT) on your Router or Firewall to transfer inbound connections from your public-facing IP address to the Local (LAN) IP address of the neatComponents machine. If your neatComponents is installed on a machine with direct Internet access - for example, at a co-location or server hosting company, then you would use that public facing IP address in the Domain IP Address in the examples above. This page explains more about working with NAT. Simulating an A-Record
You can simulate having an A-Record for testing purposes by using the 'Hosts' file on the machine you are browsing from. Your web browser (Internet Explorer, Safari, Firefox, etc) locates websites by checking the DNS record for the domain, however before the browser looks as an external DNS server it always checks its own Hosts file to see if there is a fixed address for a given domain. This method is detailed here. Server Access and Site Access
You need to set a domain or sub-domain to access the Server Manager as explained above - you also need a separate domain name for each website hosted on the server. All domains will use the same IP address (the public-facing IP address of the neatComponents server) in their A-Record. neatComponents uses the actual domain name to differentiate and know which site to serve against each request. DNS and http://local.neatcomponents.com
The URL http://local.neatcomponents.com will open the Server Manager, but ONLY if used on the machine that neatComponents is installed onto. The public 'A-Record' for local.neatcomponents.com has been set to 127.0.0.1 or the loopback address to the localhost. Naturally, you must have an active Internet connection for this to work. |