The data that will be sent between sites is sent in JSON format.
To prepare the data we need to to the following configuration in Site A:
- Configure a Query to include the records and fields that are to be sent
- Configure a JSON View on this Query
- Store the output from the JSON View
Handling images and files
JSON is a text format, best suited for storing text and numeric data. It does not natively handle binary data - images, files etc - so where these need to be included they are provided in a separate "associated files" zip file, which can then be sent along beside the JSON data, and can then be automatically recombined by a Data Import component on the receiving site.
Configuring a Query
Create a Query that will output the required data. No special treatment specific to intersite communication is needed in creating this Query. (An existing Query can also be used if it provides he required data, there is no need for a dedicated query for this purpose)
Configure a JSON View
Create a JSON View at this based in the Query.
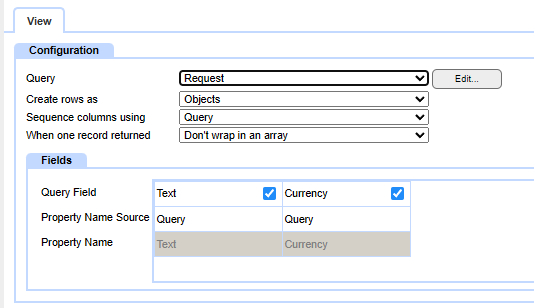
Generally the default settings will be suitable. Ensure that the fields are checkboxes are set to include the fields you wish to send. JSON fields have 'Property Names' which the JSON View defaults to taking from the names used in the Query, however you can override this by changing the "Property Name Source" to View and entering a different name in the cell below:
.png)
Store the output from the JSON View
It is recommended for clarity of configuration that a dedicated Table is created that manages the Intersite Communication.
The Table should be configured with several fields. For this aspect, we need:
- "JSON Request" - Large Text
- "JSON Request Additional Files" - File
The communication process then gets started by the triggering of an Event on this Table.
The Event then contains an Update Field action:
In this example, "JSON Request" is a Large Text field in this table, and "JSON Request Additional Files" is File field. If your JSON View won't reference any files you can leave this out.
.png)
To configure the Value to use the JSON View, click the [...] configuration button, and then choose Query View on the next dialog. From the configuration on that you can select your Query, and the JSON View linked to it.
.png)
A common requirement will be to set the Records criteria on this query to match the RecordID of the Table this Action is on. Assuming the Query has a RecordID field for this Table, you simply set it to Value = Parent Parameters for this field:
.png)
| 

