clearString neatComponents
| |
clearString neatComponents
| |
|
clearString neatComponents Telemetry |
| Reference | ||
Telemetry | ||
Telemetry allows you to record site activity and use this as the basis for charging.
System telemetry, recording the number of page hits and bandwidth usage, is automatic and made directly available to Charging Plans without any extra configuration.
For all other telemetry, you add a Telemetry Component to the site that is being measured and configure that to record the data you are interested in.
To provide the Telemetry Component with the data you also configure a Query. This can be of any structure, but just needs to provide suitable value fields for the Telemetry Component to consume.
Configuring a Telemetry Component
In the site being measured, use the Layout Manager to add a Telemetry Component.
Open the Telemetry Component to configure it.
This shows an interface with two tabs; Settings and Query
On the Query tab:
Select a Query that contains the data you are measuring. If appropriate use the Records subtab to restrict the query to return the records needed.
On the Settings tab:
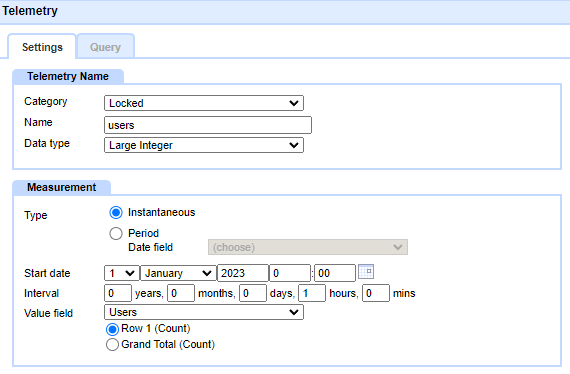
Complete the fields:
In the Telemetry Name box:
Category: Select "Locked" (as opposed to "Open") if this will be used for Charging Plan purposes, otherwise the site owner could edit this and compromise your charging.
Note: The ability to edit the Telemetry Category is controlled by a Permission "Set Telemetry Category" (as defined in the Behavior Editor, Permissions for the component). This is normally set to Allow the Reseller to do so, but not anyone else, even the Site Owner.
Name: Enter a name (eg 'users' or 'sales' etc). You will later need to enter this in the Charging Plan.
Data Type: Choose the data type that will be recorded. Options are:
- Bytes
- Currency
- Large Integer
- Number
In the Measurement box:
Type: Choose the type of measurement. Options are:
- Instantaneous
- Period
Instantaneous is for when you want to take a measurement at a moment in time, for example to count the number of users in a usergroup.
Period is for when you want to total the activity that has occurred in the period since the previous reading.
If you choose Period, then you should also select a Date field from the Query. It will then use this to restrict the returned records from the query to those which are within the date range it is reporting on (for example, if you are reporting on ecommerce sales, this would be the transaction date).
Start date: Choose the date from which telemetry readings should start. If this is backdated it will attempt to take historic readings before going on to take future ones.
Interval: Choose the period between readings. Choosing too short a period may overburden the server, while taking too infrequent may not capture sufficient data for optimum usage. Hourly or Daily readings are likely sufficient for most purposes.
Value field: Choose the field from the query that contains the value with the measurement. The dropdown provides the list of fields in the query matching the data type selected above. As appropriate you can select either the Row 1 value or the Grand Total value from the query for this field.
Standard readings and Extra readings
While the Start date and the Interval define when Standard readings are taken, the system will also take Extra readings if required (for example, when a Charging Plan is changed or a site is moved, stopped, deleted, etc)
Permissions
Normally within a site the Site Owner has the ability to configure any of the components in the site. The concept of telemetry requires an exception to this assumption, since there is a need for the Reseller (ie the user controlling a parent site) to be able to manage the telemetry without the risk of the Site Owner or anyone else from compromising the readings. If they are being charged based on the readings, they have an incentive to somehow lower them.
.png)
The Reseller may therefore remove the View Page permissions on the Telemetry Component, and any supporting components (such as Queries and data feeds) such that they cannot be accessed by users in the site. Components set in this way, when seen in the Layout Manager will be shown greyed out, and without the ability for such users to take any actions on them (so they cannot delete, move etc). The system will also prevent such users from moving components they currently can access into a section of the site where there are such permissions, to avoid a 'black hole' situation where they move something in and then find they cannot access or move it out again.
Telemetry Data Feeds
.png)
While Telemetry readings are most commonly used to provide the data for Charging Plans, the data can also be made available both in the site being measured, and in its parent sites.
To access this data for the current site, add a Telemetry Data Feed component to the site. This can then be included in a Query for querying and displaying in the usual ways.
To access data for child sites, add a Telemetry Descendent Site Data Feed component. This contains the same fields as the Telemetry Data Feed component, and adds a Site ID field to identify which site each row of data comes from.
.png)
This can be used to join to a Site Data Feed component to provide further information about each site.
.png)
Copyright © 2026 Enstar LLC All rights reserved |